
Pool heater installation is not a complicated task. Some homeowners can install pool heaters by themselves. But it is a better idea to hire a pool heater technician to do the job. These professionals can perform pool heater installation properly for them to work with maximum efficiency.
They are trained to complete the plumbing and wiring needs of a pool heating system. If your pool heater is properly installed and maintained, it can last from 5 to 15 years. Let’s find out the basics of pool heater installation.
The Best Place for Pool Heater Installation
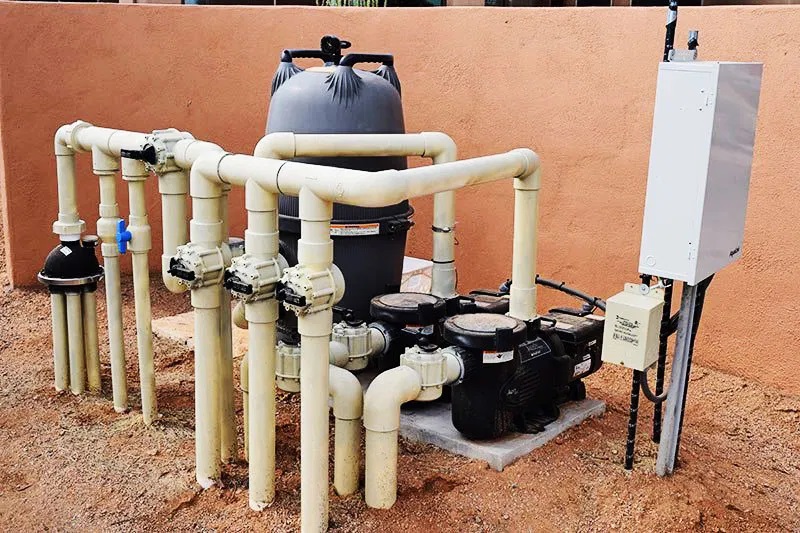
Before a pool heater installation, the first step is to determine where to place your pool heater. First, it should be away from combustible materials for safety reasons. Based on universal guidelines, the front heater should have at least a 24 inches clearance from any combustible material while the backside should have at least 6 inches of clearance.
The side of the water connection must have a minimum of 12 inches clearance. If your pool heater installation is situated in an overhang, there must be a vertical clearance of at least 4 feet from the top of the pool heater and the overhang. The same goes if your pool heater installation is indoor. All indoor pool heaters must have a 5 feet distance from an inside wall.
It is also important to install a pool heater on a non-combustible base. Brick or concrete may work best because they can withstand the heat coming out from the unit. The pool heater should not be exposed to the wind, a wall or wind block can protect it.
To prevent heat loss and to maximize the efficiency of a pool heater, it should be situated near the pool area. This can also save you from plumbing costs. The pool heater must be at the end surface of a water filter and water pump. This is to make sure that the water entering the pool heater is clean. Dirty water can damage a pool heater.
How to Install a Pool Heater
Pool heaters must be placed within a straight line with the gas and water connection. Make sure that there is sufficient room in the back, front, sides, and above the unit based on the installation guide. The first thing to do is to connect the wiring based on the installation guide.
If your pool uses a remote wiring system, you may also need to connect the wiring to the pool’s controller. Double-check if all the wirings are properly connected. Never combined the high voltage wiring and the remote wiring. Put them on separate installation holes located on the side panel of your pool heater.
The next step is to bolt the water conduit securely to the pool heater cabinet. Attach the plumbing connection of your pool heater to the pool’s plumbing system. Be sure to install the pipes into their respective inlet and outlet ports. Check the front header or manifold arrow or label to be sure. Lubricate the gasket with silicone to seal it.
Once both the electric wirings and water connection are in place the final step to a pool heater installation is to connect it to a power source. For a gas pool heater, you can contact your natural gas or propane supplier to do so. For an electric pool heater, you will need to call an electrician to tap it to the main electric power line. For a solar pool heater, you may also need an electrician to connect your pool heater to your solar panels.
In general, it’s best to hire a pool heater professional to perform pool heating installation.


Comments